 Redis是什么?redis是一款基于BSD协议,开源的非关系型数据库(nosql数据库),作者是意大利开发者Salvatore Sanfilippo在2009年发布,使用C语言编写;redis是基于内存存储,而且是目前比较流行的键值数据库(key-value database),它提供将内存通过网络远程共享的一种服务,提供类似功能的还有memcache,但相比 memcache,redis 还提供了易扩展、高性能、具备数据持久性等功能。主要的应用场景有session共享,常用于web集群中的tomcat或PHP中多web服务器的session共享;消息队列,ELK的日志缓存,部分业务的订阅发布系统;计数器,常用于访问排行榜,商品浏览数等和次数相关的数值统计场景;缓存,常用于数据查询、电商网站商品信息、新闻内容等;
 一、简介
Redis是什么?redis是一款基于BSD协议,开源的非关系型数据库(nosql数据库),作者是意大利开发者Salvatore Sanfilippo在2009年发布,使用C语言编写;redis是基于内存存储,而且是目前比较流行的键值数据库(key-value database),它提供将内存通过网络远程共享的一种服务,提供类似功能的还有memcache,但相比 memcache,redis 还提供了易扩展、高性能、具备数据持久性等功能。主要的应用场景有session共享,常用于web集群中的tomcat或PHP中多web服务器的session共享;消息队列,ELK的日志缓存,部分业务的订阅发布系统;计数器,常用于访问排行榜,商品浏览数等和次数相关的数值统计场景;缓存,常用于数据查询、电商网站商品信息、新闻内容等;相对memcache,redis支持数据的持久化,可以将内存的数据保存在磁盘中,重启redis服务或者服务器之后可以从备份文件中恢复数据到内存继续使用;支持string(字符串)、hashes(关联数组)、list(列表)、set(集合)、sorted set(有序集合)、空间索引等数据结构的数据;支持数据的备份,可以实现类似于mysql中的主从模式的数据备份,支持使用快照和AOF(append only file)的数据持久化;支持比memcache更大的value数据,在memcache中只单个key value最大支持1MB,而redis最大支持512MB;Redis 是单线程,而 memcache 是多线程,所以单机情况下没有 memcache 并发高,但 redis 支持分布式集群以实现更高的并发,单 Redis 实例可以实现数万并发。除此以外,redis也支持集群横向扩展,基于redis cluster 的横向扩展,可以实现分布式集群,大幅度提升性能和数据安全;
二、redis安装
redis安装支持yum直接安装,前提是要配好epel源,该软件存放在epel仓库中;当然也可以下载源码直接编译安装,根据自己生产环境的需求,yum安装的版本稍微要旧一点,如果对应版本能够满足现有业务的需求,我个人觉得编译安装就没有必要;通常较新的程序在生产环境不建议使用;
1、yum安装
查看redis在epel源中的版本和简介
[root@node1 ~]# yum info redisLoaded plugins: fastestmirrorLoading mirror speeds from cached hostfile * base: mirrors.aliyun.com * extras: mirrors.aliyun.com * updates: mirrors.aliyun.comAvailable PackagesName : redisArch : x86_64Version : 3.2.12Release : 2.el7Size : 544 kRepo : epel/x86_64Summary : A persistent key-value databaseURL : : BSDDescription : Redis is an advanced key-value store. It is often referred to as a data : structure server since keys can contain strings, hashes, lists, sets and : sorted sets. : : You can run atomic operations on these types, like appending to a string; : incrementing the value in a hash; pushing to a list; computing set : intersection, union and difference; or getting the member with highest : ranking in a sorted set. : : In order to achieve its outstanding performance, Redis works with an : in-memory dataset. Depending on your use case, you can persist it either : by dumping the dataset to disk every once in a while, or by appending : each command to a log. : : Redis also supports trivial-to-setup master-slave replication, with very : fast non-blocking first synchronization, auto-reconnection on net split : and so forth. : : Other features include Transactions, Pub/Sub, Lua scripting, Keys with a : limited time-to-live, and configuration settings to make Redis behave like : a cache. : : You can use Redis from most programming languages also.[root@node1 ~]#
提示:redis在epel中的版本是3.2.12,目前redis最新的版本是6.0.6,当然我们也可以去第三方网站找最新版本的rpm包,然后使用yum安装也行;
yum安装redis
[root@node1 ~]# yum install -y redisLoaded plugins: fastestmirrorLoading mirror speeds from cached hostfile * base: mirrors.aliyun.com * extras: mirrors.aliyun.com * updates: mirrors.aliyun.comResolving Dependencies--> Running transaction check---> Package redis.x86_64 0:3.2.12-2.el7 will be installed--> Processing Dependency: libjemalloc.so.1()(64bit) for package: redis-3.2.12-2.el7.x86_64--> Running transaction check---> Package jemalloc.x86_64 0:3.6.0-1.el7 will be installed--> Finished Dependency ResolutionDependencies Resolved======================================================================================================================== Package Arch Version Repository Size========================================================================================================================Installing: redis x86_64 3.2.12-2.el7 epel 544 kInstalling for dependencies: jemalloc x86_64 3.6.0-1.el7 epel 105 kTransaction Summary========================================================================================================================Install 1 Package (+1 Dependent package)Total download size: 648 kInstalled size: 1.7 MDownloading packages:(1/2): jemalloc-3.6.0-1.el7.x86_64.rpm | 105 kB 00:00:00 (2/2): redis-3.2.12-2.el7.x86_64.rpm | 544 kB 00:00:00 ------------------------------------------------------------------------------------------------------------------------Total 1.4 MB/s | 648 kB 00:00:00 Running transaction checkRunning transaction testTransaction test succeededRunning transaction Installing : jemalloc-3.6.0-1.el7.x86_64 1/2 Installing : redis-3.2.12-2.el7.x86_64 2/2 Verifying : redis-3.2.12-2.el7.x86_64 1/2 Verifying : jemalloc-3.6.0-1.el7.x86_64 2/2 Installed: redis.x86_64 0:3.2.12-2.el7 Dependency Installed: jemalloc.x86_64 0:3.6.0-1.el7 Complete![root@node1 ~]#
查看redis的程序环境
[root@node1 ~]# rpm -ql redis/etc/logrotate.d/redis/etc/redis-sentinel.conf/etc/redis.conf/etc/systemd/system/redis-sentinel.service.d/etc/systemd/system/redis-sentinel.service.d/limit.conf/etc/systemd/system/redis.service.d/etc/systemd/system/redis.service.d/limit.conf/usr/bin/redis-benchmark/usr/bin/redis-check-aof/usr/bin/redis-check-rdb/usr/bin/redis-cli/usr/bin/redis-sentinel/usr/bin/redis-server/usr/lib/systemd/system/redis-sentinel.service/usr/lib/systemd/system/redis.service/usr/libexec/redis-shutdown/usr/share/doc/redis-3.2.12/usr/share/doc/redis-3.2.12/00-RELEASENOTES/usr/share/doc/redis-3.2.12/BUGS/usr/share/doc/redis-3.2.12/CONTRIBUTING/usr/share/doc/redis-3.2.12/MANIFESTO/usr/share/doc/redis-3.2.12/README.md/usr/share/licenses/redis-3.2.12/usr/share/licenses/redis-3.2.12/COPYING/usr/share/man/man1/redis-benchmark.1.gz/usr/share/man/man1/redis-check-aof.1.gz/usr/share/man/man1/redis-check-rdb.1.gz/usr/share/man/man1/redis-cli.1.gz/usr/share/man/man1/redis-sentinel.1.gz/usr/share/man/man1/redis-server.1.gz/usr/share/man/man5/redis-sentinel.conf.5.gz/usr/share/man/man5/redis.conf.5.gz/var/lib/redis/var/log/redis/var/run/redis[root@node1 ~]#
提示:从上面命令返回的信息大概能够知道/etc/redis.conf是redis的配置文件,/usr/bin/redis-server是服务端程序,/usr/bin/redis-cli是客户端程序,/usr/lib/systemd/system/redis.service是redis的unit file服务管理脚本,/var/lib/redis是redis的数据目录;
启动redis
[root@node1 ~]# systemctl start redis[root@node1 ~]# ss -ntlState Recv-Q Send-Q Local Address:Port Peer Address:Port LISTEN 0 128 127.0.0.1:6379 *:* LISTEN 0 128 *:22 *:* LISTEN 0 100 127.0.0.1:25 *:* LISTEN 0 128 :::22 :::* LISTEN 0 100 ::1:25 :::* [root@node1 ~]#
提示:redis默认监听在本机的127.0.0.1的6379端口,默认为了安全没有监听在其他地址,所以默认配置的redis不能够远程连接使用,必须修改配置文件中的监听地址才可以;
验证:用redis-cli连接redis server

提示:到此如果能够正常启动redis,能够用客户端连接到redis server 操作redis说明我们部署的redis服务就部署好了;
2、编译安装redis
准备源码包,和编译环境
[root@node2 yum.repos.d]# yum groupinstall "development tools"Loaded plugins: fastestmirrorThere is no installed groups file.Maybe run: yum groups mark convert (see man yum)extras | 2.9 kB 00:00:00 extras/7/x86_64/primary_db | 205 kB 00:00:00 Loading mirror speeds from cached hostfile * base: mirrors.aliyun.com * extras: mirrors.aliyun.com * updates: mirrors.aliyun.comResolving Dependencies--> Running transaction check---> Package autoconf.noarch 0:2.69-11.el7 will be installed--> Processing Dependency: m4 >= 1.4.14 for package: autoconf-2.69-11.el7.noarch---> Package automake.noarch 0:1.13.4-3.el7 will be installed--> Processing Dependency: perl(Thread::Queue) for package: automake-1.13.4-3.el7.noarch--> Processing Dependency: perl(TAP::Parser) for package: automake-1.13.4-3.el7.noarch……省略部分内容……Installed: autoconf.noarch 0:2.69-11.el7 automake.noarch 0:1.13.4-3.el7 bison.x86_64 0:3.0.4-2.el7 byacc.x86_64 0:1.9.20130304-3.el7 cscope.x86_64 0:15.8-10.el7 ctags.x86_64 0:5.8-13.el7 diffstat.x86_64 0:1.57-4.el7 doxygen.x86_64 1:1.8.5-4.el7 elfutils.x86_64 0:0.176-4.el7 flex.x86_64 0:2.5.37-6.el7 gcc.x86_64 0:4.8.5-39.el7 gcc-c++.x86_64 0:4.8.5-39.el7 gcc-gfortran.x86_64 0:4.8.5-39.el7 indent.x86_64 0:2.2.11-13.el7 intltool.noarch 0:0.50.2-7.el7 libtool.x86_64 0:2.4.2-22.el7_3 patch.x86_64 0:2.7.1-12.el7_7 patchutils.x86_64 0:0.3.3-4.el7 rcs.x86_64 0:5.9.0-7.el7 redhat-rpm-config.noarch 0:9.1.0-88.el7.centos rpm-build.x86_64 0:4.11.3-43.el7 rpm-sign.x86_64 0:4.11.3-43.el7 subversion.x86_64 0:1.7.14-14.el7 swig.x86_64 0:2.0.10-5.el7 systemtap.x86_64 0:4.0-11.el7 Dependency Installed: apr.x86_64 0:1.4.8-5.el7 apr-util.x86_64 0:1.5.2-6.el7 avahi-libs.x86_64 0:0.6.31-20.el7 boost-date-time.x86_64 0:1.53.0-28.el7 boost-system.x86_64 0:1.53.0-28.el7 boost-thread.x86_64 0:1.53.0-28.el7 bzip2.x86_64 0:1.0.6-13.el7 cpp.x86_64 0:4.8.5-39.el7 dwz.x86_64 0:0.11-3.el7 dyninst.x86_64 0:9.3.1-3.el7 efivar-libs.x86_64 0:36-12.el7 emacs-filesystem.noarch 1:24.3-23.el7 gdb.x86_64 0:7.6.1-119.el7 gettext-common-devel.noarch 0:0.19.8.1-3.el7 gettext-devel.x86_64 0:0.19.8.1-3.el7 glibc-devel.x86_64 0:2.17-307.el7.1 glibc-headers.x86_64 0:2.17-307.el7.1 gnutls.x86_64 0:3.3.29-9.el7_6 json-c.x86_64 0:0.11-4.el7_0 kernel-debug-devel.x86_64 0:3.10.0-1127.13.1.el7 kernel-headers.x86_64 0:3.10.0-1127.13.1.el7 libdwarf.x86_64 0:20130207-4.el7 libgfortran.x86_64 0:4.8.5-39.el7 libmodman.x86_64 0:2.0.1-8.el7 libmpc.x86_64 0:1.0.1-3.el7 libproxy.x86_64 0:0.4.11-11.el7 libquadmath.x86_64 0:4.8.5-39.el7 libquadmath-devel.x86_64 0:4.8.5-39.el7 libstdc++-devel.x86_64 0:4.8.5-39.el7 m4.x86_64 0:1.4.16-10.el7 mokutil.x86_64 0:15-2.el7.centos mpfr.x86_64 0:3.1.1-4.el7 neon.x86_64 0:0.30.0-4.el7 nettle.x86_64 0:2.7.1-8.el7 pakchois.x86_64 0:0.4-10.el7 perl-Test-Harness.noarch 0:3.28-3.el7 perl-Thread-Queue.noarch 0:3.02-2.el7 perl-提示:redis是C语言编写的,所以在Linux上编译C语言程序必须先安装gcc和一些常用的开发库;
下载源码包
解压源码包并进入到源码包解压目录
[root@node2 ~]# tar xf redis-6.0.6.tar.gz -C /usr/local/src/tar: redis-6.0.6/.github/workflows/ci.yml: time stamp 2020-07-20 14:08:26 is 2772054.289890648 s in the futuretar: redis-6.0.6/.github/workflows/daily.yml: time stamp 2020-07-20 14:08:26 is 2772054.289327433 s in the futuretar: redis-6.0.6/.github/workflows: time stamp 2020-07-20 14:08:26 is 2772054.289233619 s in the futuretar: redis-6.0.6/.github: time stamp 2020-07-20 14:08:26 is 2772054.289183193 s in the futuretar: redis-6.0.6/.gitignore: time stamp 2020-07-20 14:08:26 is 2772054.289072272 s in the futuretar: redis-6.0.6/00-RELEASENOTES: time stamp 2020-07-20 14:08:26 is 2772054.288536889 s in the futuretar: redis-6.0.6/BUGS: time stamp 2020-07-20 14:08:26 is 2772054.288364759 s in the futuretar: redis-6.0.6/CONTRIBUTING: time stamp 2020-07-20 14:08:26 is 2772054.287142408 s in the future……省略部分内容……[root@node2 ~]# cd /usr/local/src/[root@node2 src]# lsredis-6.0.6[root@node2 src]# cd redis-6.0.6/[root@node2 redis-6.0.6]#编译并安装redis到/usr/local/redis
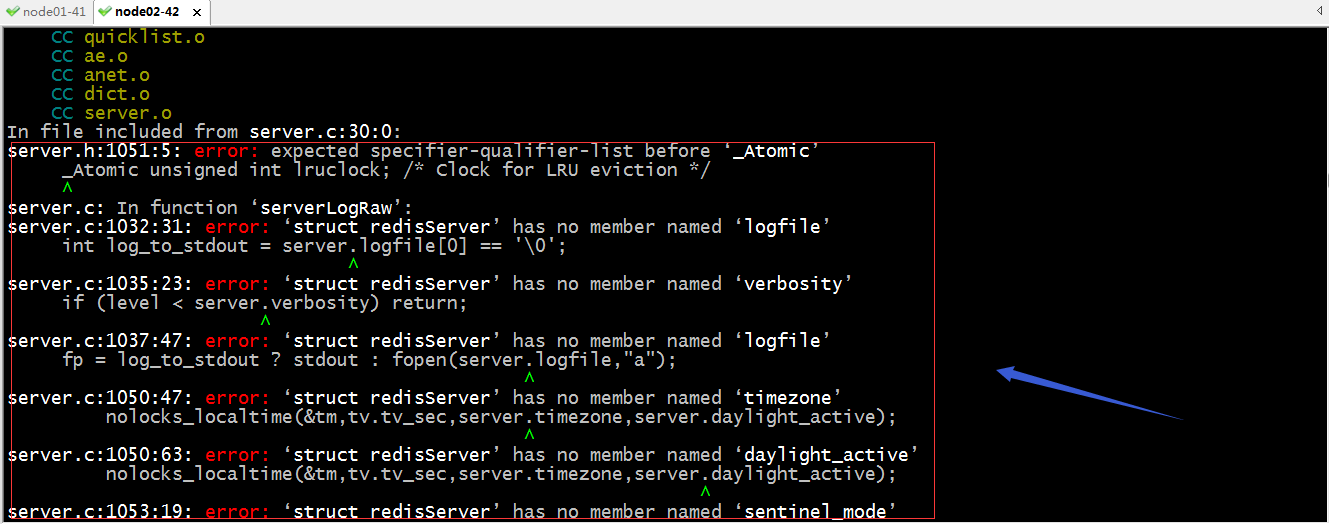
提示:像这类错误,原因是centos上的gcc版本是4.8.5,版本过低导致的,解决办法就是装一个新版本的gcc(大于5.3)
升级gcc
[root@node2 redis-6.0.6]# yum install centos-release-sclLoaded plugins: fastestmirrorLoading mirror speeds from cached hostfile * base: mirrors.aliyun.com * extras: mirrors.aliyun.com * updates: mirrors.aliyun.comResolving Dependencies--> Running transaction check---> Package centos-release-scl.noarch 0:2-3.el7.centos will be installed--> Processing Dependency: centos-release-scl-rh for package: centos-release-scl-2-3.el7.centos.noarch--> Running transaction check---> Package centos-release-scl-rh.noarch 0:2-3.el7.centos will be installed--> Finished Dependency ResolutionDependencies Resolved======================================================================================================================== Package Arch Version Repository Size========================================================================================================================Installing: centos-release-scl noarch 2-3.el7.centos extras 12 kInstalling for dependencies: centos-release-scl-rh noarch 2-3.el7.centos extras 12 kTransaction Summary========================================================================================================================Install 1 Package (+1 Dependent package)Total download size: 24 kInstalled size: 39 kIs this ok [y/d/N]: yDownloading packages:(1/2): centos-release-scl-2-3.el7.centos.noarch.rpm | 12 kB 00:00:00 (2/2): centos-release-scl-rh-2-3.el7.centos.noarch.rpm | 12 kB 00:00:00 ------------------------------------------------------------------------------------------------------------------------Total 83 kB/s | 24 kB 00:00:00 Running transaction checkRunning transaction testTransaction test succeededRunning transaction Installing : centos-release-scl-rh-2-3.el7.centos.noarch 1/2 Installing : centos-release-scl-2-3.el7.centos.noarch 2/2 Verifying : centos-release-scl-2-3.el7.centos.noarch 1/2 Verifying : centos-release-scl-rh-2-3.el7.centos.noarch 2/2 Installed: centos-release-scl.noarch 0:2-3.el7.centos Dependency Installed: centos-release-scl-rh.noarch 0:2-3.el7.centos Complete![root@node2 redis-6.0.6]#提示:安装centos-release-scl主要是添加scl仓库地址文件到本地
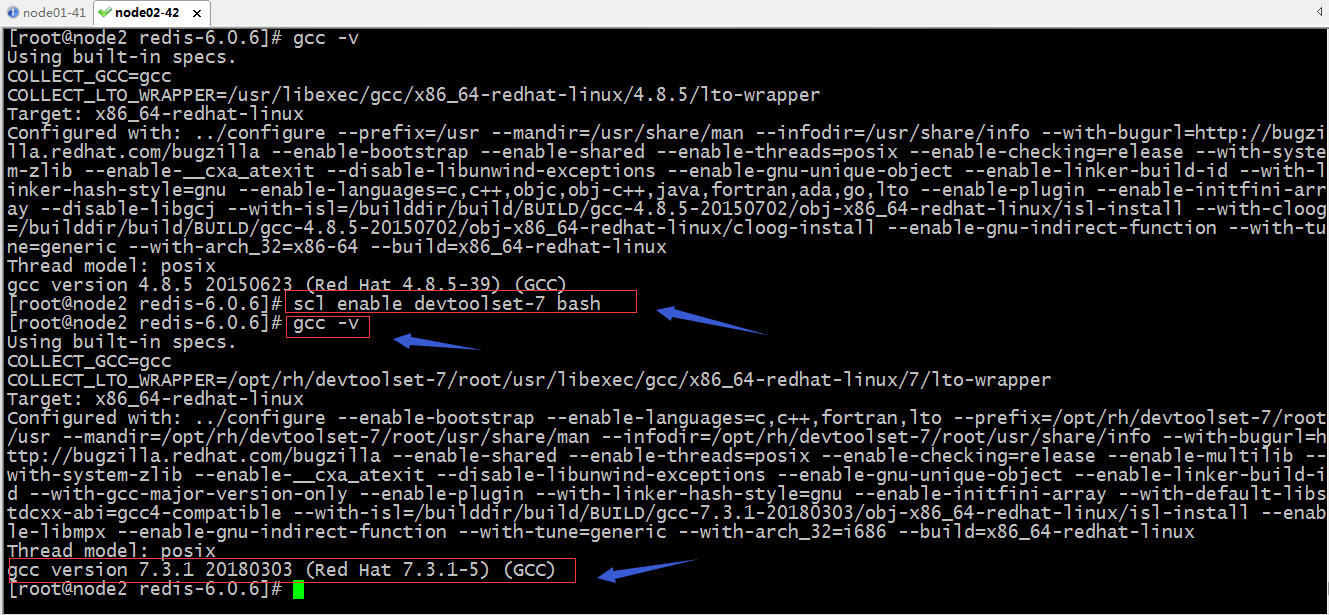
[root@node2 redis-6.0.6]# yum install devtoolset-7-gcc*Loaded plugins: fastestmirrorcentos-sclo-rh | 3.0 kB 00:00:00 centos-sclo-sclo | 3.0 kB 00:00:00 (1/2): centos-sclo-sclo/x86_64/primary_db | 291 kB 00:00:00 (2/2): centos-sclo-rh/x86_64/primary_db | 2.9 MB 00:00:00 Loading mirror speeds from cached hostfile * base: mirrors.aliyun.com * centos-sclo-rh: mirrors.aliyun.com * centos-sclo-sclo: mirrors.aliyun.com * extras: mirrors.aliyun.com * updates: mirrors.aliyun.comResolving Dependencies--> Running transaction check---> Package devtoolset-7-gcc.x86_64 0:7.3.1-5.16.el7 will be installed--> Processing Dependency: devtoolset-7-binutils >= 2.22.52.0.1 for package: devtoolset-7-gcc-7.3.1-5.16.el7.x86_64……省略部分内容……Installed: devtoolset-7-gcc.x86_64 0:7.3.1-5.16.el7 devtoolset-7-gcc-c++.x86_64 0:7.3.1-5.16.el7 devtoolset-7-gcc-gdb-plugin.x86_64 0:7.3.1-5.16.el7 devtoolset-7-gcc-gfortran.x86_64 0:7.3.1-5.16.el7 devtoolset-7-gcc-plugin-devel.x86_64 0:7.3.1-5.16.el7 Dependency Installed: audit-libs-python.x86_64 0:2.8.5-4.el7 checkpolicy.x86_64 0:2.5-8.el7 devtoolset-7-binutils.x86_64 0:2.28-11.el7 devtoolset-7-libquadmath-devel.x86_64 0:7.3.1-5.16.el7 devtoolset-7-libstdc++-devel.x86_64 0:7.3.1-5.16.el7 devtoolset-7-runtime.x86_64 0:7.1-4.el7 gmp-devel.x86_64 1:6.0.0-15.el7 libcgroup.x86_64 0:0.41-21.el7 libgfortran4.x86_64 0:8.3.1-2.1.1.el7 libmpc-devel.x86_64 0:1.0.1-3.el7 libsemanage-python.x86_64 0:2.5-14.el7 mpfr-devel.x86_64 0:3.1.1-4.el7 policycoreutils-python.x86_64 0:2.5-34.el7 python-IPy.noarch 0:0.75-6.el7 scl-utils.x86_64 0:20130529-19.el7 setools-libs.x86_64 0:3.3.8-4.el7 Dependency Updated: audit.x86_64 0:2.8.5-4.el7 audit-libs.x86_64 0:2.8.5-4.el7 libselinux.x86_64 0:2.5-15.el7 libselinux-python.x86_64 0:2.5-15.el7 libselinux-utils.x86_64 0:2.5-15.el7 libsemanage.x86_64 0:2.5-14.el7 libsepol.x86_64 0:2.5-10.el7 policycoreutils.x86_64 0:2.5-34.el7 Complete![root@node2 redis-6.0.6]#切换新版本的gcc
提示:这种方式是临时切换方式,如果需要永久切换,我们可以在/etc/profile文件中追加一条 souce /opt/rh/devtoolset-7/enable命令即可;
现在我们把gcc的版本切换到7.3.1,再来编译redis看看是否还会有错误发生?
[root@node2 redis-6.0.6]# make PREFIX=/usr/local/redis installmake: Warning: File `Makefile' has modification time 2768632 s in the futurecd src && make installmake[1]: Entering directory `/usr/local/src/redis-6.0.6/src'make[1]: Warning: File `Makefile' has modification time 2768632 s in the future CC adlist.o CC quicklist.o CC ae.o CC anet.o CC dict.o CC server.o CC sds.o CC zmalloc.o CC lzf_c.o CC lzf_d.o CC pqsort.o CC zipmap.o CC sha1.o CC ziplist.o CC release.o CC networking.o CC util.o CC object.o CC db.o CC replication.o CC rdb.o CC t_string.o CC t_list.o CC t_set.o CC t_zset.o CC t_hash.o CC config.o CC aof.o CC pubsub.o CC multi.o CC debug.o CC sort.o CC intset.o CC syncio.o CC cluster.o CC crc16.o CC endianconv.o CC slowlog.o CC scripting.o CC bio.o CC rio.o CC rand.o CC memtest.o CC crcspeed.o CC crc64.o CC bitops.o CC sentinel.o CC notify.o CC setproctitle.o CC blocked.o CC hyperloglog.o CC latency.o CC sparkline.o CC redis-check-rdb.o CC redis-check-aof.o CC geo.o CC lazyfree.o CC module.o CC evict.o CC expire.o CC geohash.o CC geohash_helper.o CC childinfo.o CC defrag.o CC siphash.o CC rax.o CC t_stream.o CC listpack.o CC localtime.o CC lolwut.o CC lolwut5.o CC lolwut6.o CC acl.o CC gopher.o CC tracking.o CC connection.o CC tls.o CC sha256.o CC timeout.o CC setcpuaffinity.o LINK redis-server INSTALL redis-sentinel CC redis-cli.o LINK redis-cli CC redis-benchmark.o LINK redis-benchmark INSTALL redis-check-rdb INSTALL redis-check-aofHint: It's a good idea to run 'make test' ;) INSTALL install INSTALL install INSTALL install INSTALL install INSTALL installmake[1]: warning: Clock skew detected. Your build may be incomplete.make[1]: Leaving directory `/usr/local/src/redis-6.0.6/src'make: warning: Clock skew detected. Your build may be incomplete.[root@node2 redis-6.0.6]#提示:切换gcc后,再次编译安装就没有报错了,到此redis编译安装就完成了;
查看编译安装好的redis目录结构
[root@node2 redis-6.0.6]# tree /usr/local/redis//usr/local/redis/└── bin ├── redis-benchmark ├── redis-check-aof ├── redis-check-rdb ├── redis-cli ├── redis-sentinel -> redis-server └── redis-server1 directory, 6 files[root@node2 redis-6.0.6]#创建软连接到/usr/bin/
创建redis用户,并拷贝配置文件到redis安装目录
更改redis安装目录下的所有文件的属主和属组为redis
[root@node2 redis-6.0.6]# chown -R redis.redis /usr/local/redis/[root@node2 redis-6.0.6]# ll /usr/local/redis/total 0drwxr-xr-x 2 redis redis 134 Jun 18 13:04 bindrwxr-xr-x 2 redis redis 24 Jun 18 13:18 etc[root@node2 redis-6.0.6]# ll /usr/local/redis/bin/total 35700-rwxr-xr-x 1 redis redis 4717872 Jun 18 13:04 redis-benchmark-rwxr-xr-x 1 redis redis 8952752 Jun 18 13:04 redis-check-aof-rwxr-xr-x 1 redis redis 8952752 Jun 18 13:04 redis-check-rdb-rwxr-xr-x 1 redis redis 4973312 Jun 18 13:04 redis-clilrwxrwxrwx 1 redis redis 12 Jun 18 13:04 redis-sentinel -> redis-server-rwxr-xr-x 1 redis redis 8952752 Jun 18 13:04 redis-server[root@node2 redis-6.0.6]# ll /usr/local/redis/etc/total 84-rw-r--r-- 1 redis redis 83392 Jun 18 13:18 redis.conf[root@node2 redis-6.0.6]#前台启动redis
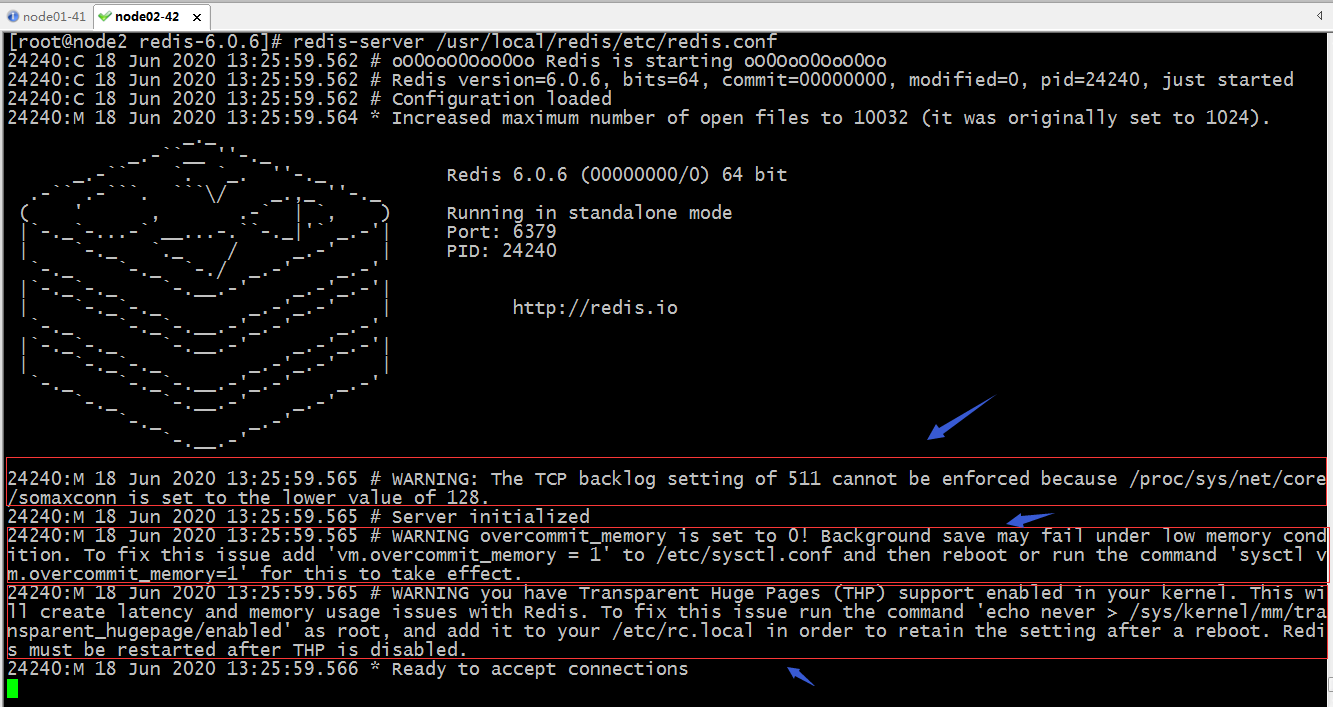
提示:前台启动redis它给了我们三个警告,第一个是backlog设置的是511,但是/proc/sys/net/core/somaxconn设置的是128,需要更改;第二是是内核参数overcommit_memory设置的是0,如果设置成0在内核将检查是否有足够的可用内存供应用进程使用时,如果有足够的可用内存,内存申请允许,否则内存申请失败,并把错误返回给应用进程。这个内核参数有三个值0,1,2;其中1表示内核允许分配所有的物理内存,而不管当前的内存状态如何。2表示内核允许分配超过所有物理内存和交换空间总和的内存;第三个警告是内核开启了大页内存动态分配,需要关闭,让redis自己负责内存管理;
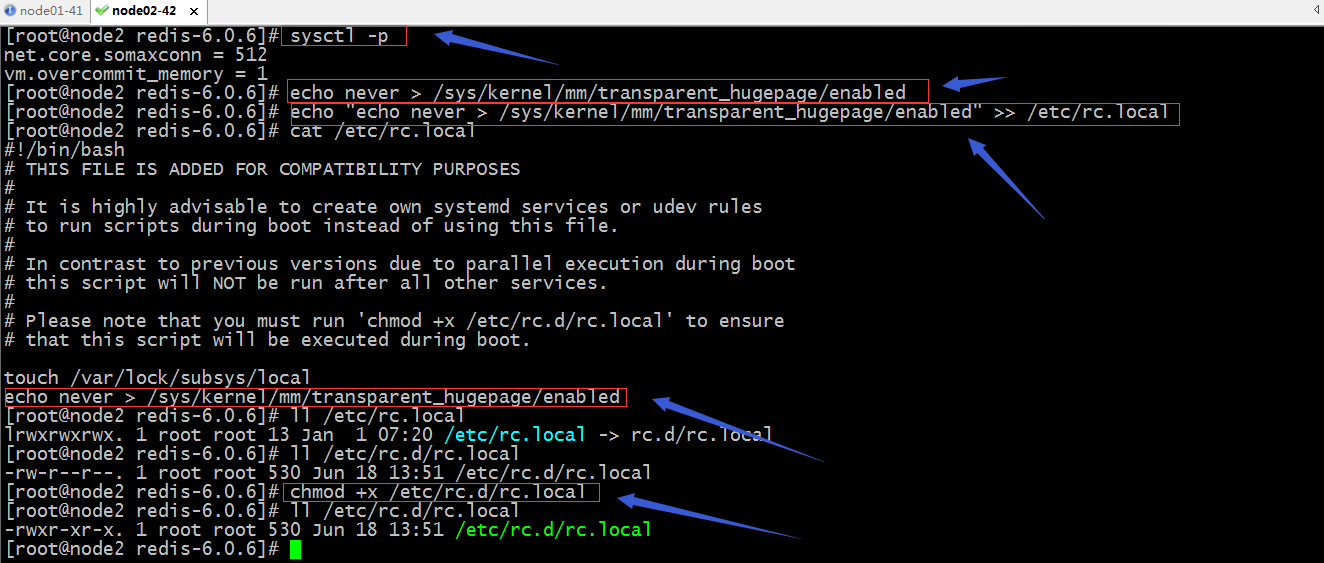
解决警告提示
提示:在centos7上/etc/rc.d/rc.local这个文件是没有执行权限的,这意味着我们在这个文件中写的开机启动命令是不会执行的,我们需要给它加上执行权限,在开机启动时里面写的开机启动命令才会被执行;在centos6上我们不需要给它加执行权限;
再次前台启动redis看看,看看是否还会有警告信息
验证6379端口是否启动,是否可以用redis-cli连接到redis-server上?
提示:可以看到重新开一个终端,能够看到6379端口监听在127.0.0.1这个地址上,并且我们使用redis-cli也可以正常连接到redis-server上正常操作;
给redis提供unit file让systemd来管理redis
提示:上面的ExecStart需要根据redis-server所在目录来指定
unit file
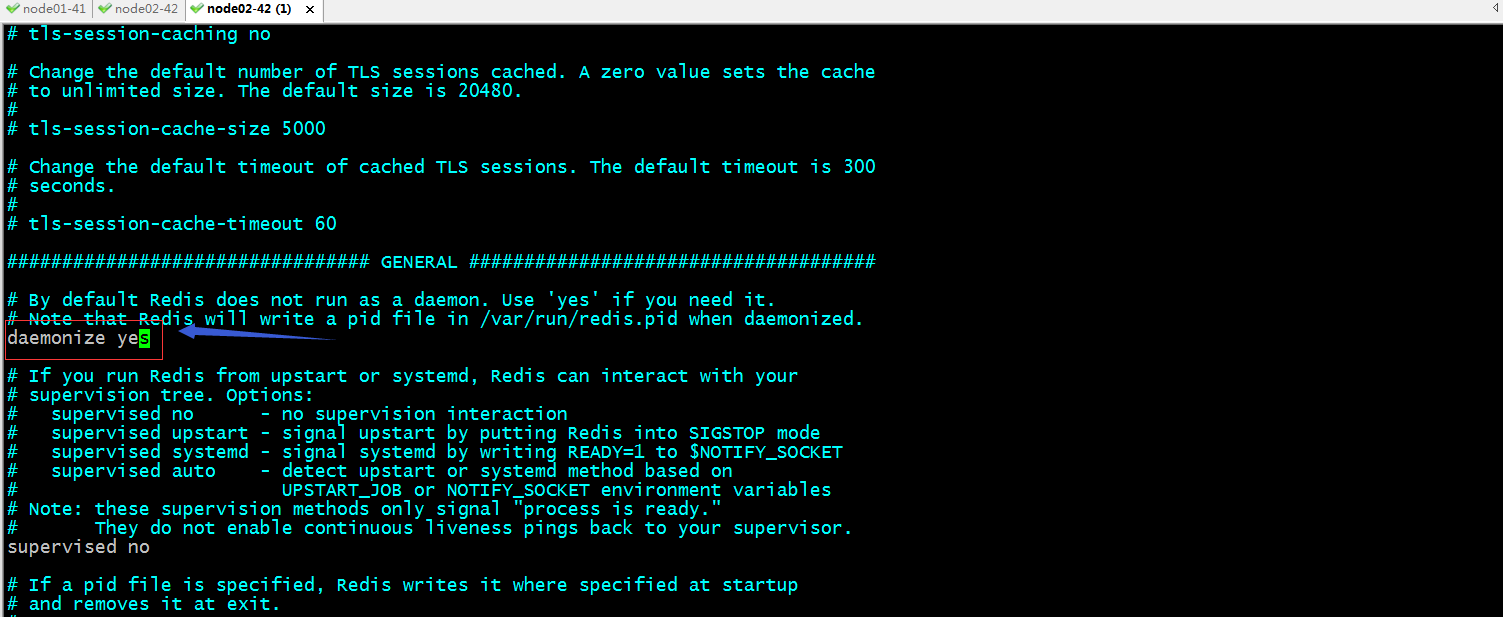
[Unit]Description=Redis persistent key-value databaseAfter=network.targetAfter=network-online.targetWants=network-online.target[Service]ExecStart=/usr/local/redis/bin/redis-server /usr/local/redis/etc/redis.conf --supervised systemdExecReload=/bin/kill -s HUP $MAINPIDExecStop=/bin/kill -s QUIT $MAINPIDType=forkingUser=redisGroup=redisRuntimeDirectory=redisRuntimeDirectoryMode=0755LimitNOFILE=65535[Install]WantedBy=multi-user.targetView Code修改配置文件让redis默认后台运行
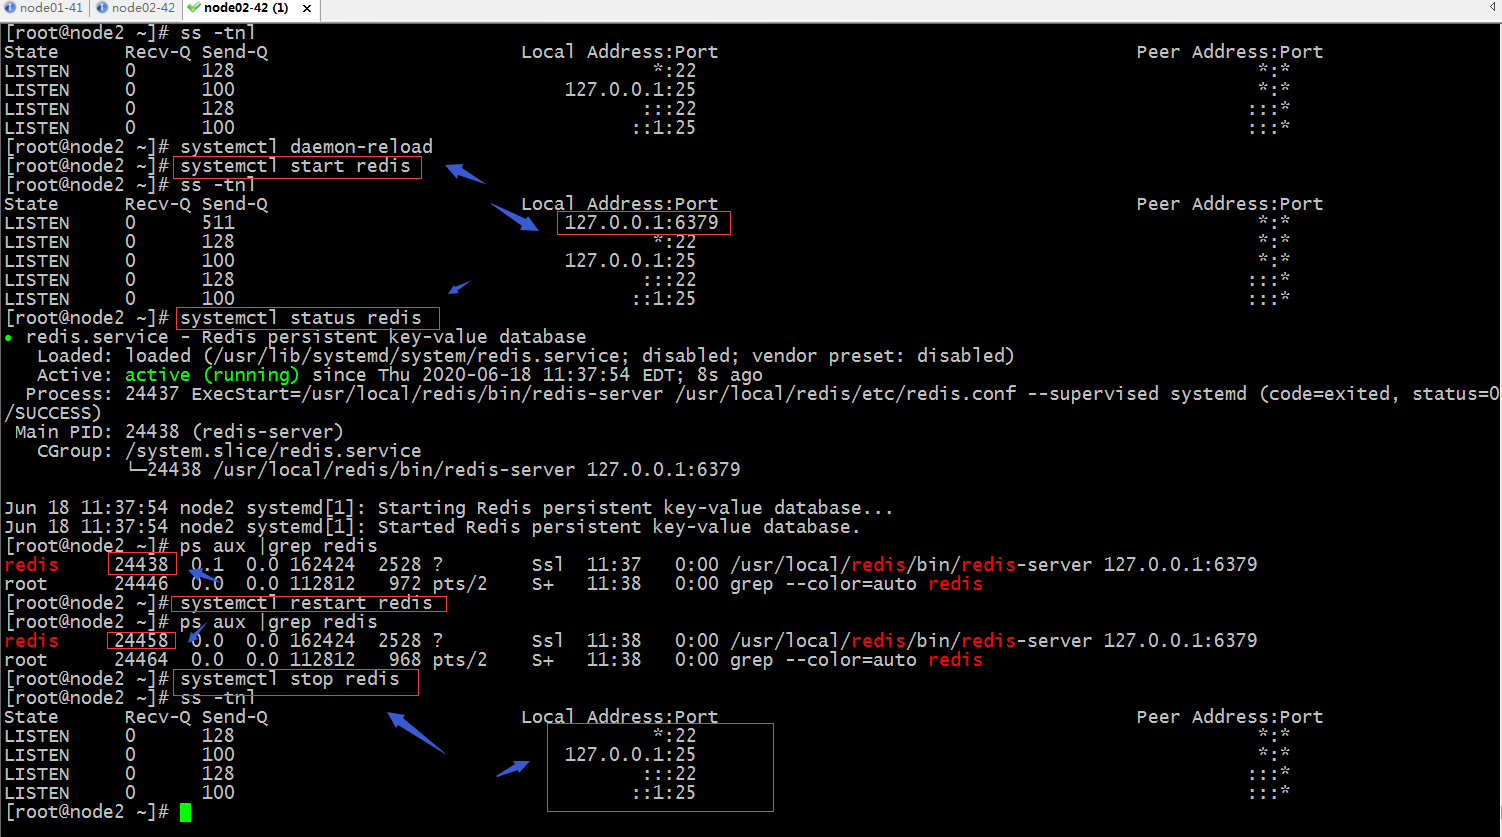
验证:用systemctl命令来管理redis, 看看是否能够起停redis?
提示:可以看到用systemd可以正常的启动,重启,停止redis,设置redis开启启动,关闭开机启动,查看状态这些操作;
Redis服务之简介与部署hemingway、 c79、 taofenba、 eBay在2018年被选为超级品牌!、 做亚马逊那么久,你真的懂UPC吗?、 美国6月1日征税,亚马逊卖家如何趋利避害?、 危楼高百尺 看芝加哥顶级摩天大楼、 西藏边境生态游 仓央嘉措情歌中的秘境、 适合冬天旅游的地方 让时间滞留在鼓浪屿、







No comments:
Post a Comment